Wednesday, 22 December 2010

Assignment 3: Monochrome Review

Idea/Theme

All the exercises in this project have been to do with recognising tones, the strength of interpretation and understanding how the practical use of channel adjustments can help fine tune black and white images, also to understand the creative effect of a monochrome image.

Due to weather and outside lighting conditions not being very favourable I decided to create a still life theme once more. For this assignment I set myself the challenge to include humour (well they made my mum smile!), objects which were nostalgic, children's toys familiar to me and probably the majority of any prospective audience, mixed with common idioms, whilst also exploring the monochrome image qualities of form, tonal contrast, texture and possibly key.

The ideas I had were many and varied but some were not achievable, either because I was unable to secure the correct props or they just did not translate as well photographically as anticipated. Wanting to experiment with either shadows or reflections, open-minded as to which, I purchased a piece of perspex to stand my subjects on.

The Set Up

My dining  room was again converted into a temporary studio, table pushed against the window, black or white fabric used as a backdrop, perspex laid flat on top, and this time with the added bonus of a small light box and two small lamps with daylight bulbs. Working with several small items, some slippery, masking tape and sticky pads were employed where necessary. Camera, tripod, release cable, macro lens and 70-300mm lens were used.

Workflow

Workflow as before, check all equipment, arrange set up, shoot images, check whilst shooting, re-shoot if needed, edit, process.

Final Images

Due to consistent lighting conditions and a similar set up with all the final images I used my 100mm macro lens  and an aperture of f29 for all except for one, as this provided the required depth of field. Lucky to have held onto several of my children's and my own personal childhood toys I was able to incorporate some in each scene, hopefully adding the humour and recognition. These props also added the texture/repeat patterns that I hope would create a final interesting monochrome set. All images were shot using Jpeg+Raw, opened in ACR for basic correction if needed and then processed in Photoshop using the Black and White Adjustment layers and other Adjustment Layers as required. To have a balanced set I hoped to create 3 high key images and 3 low key.


1) Going to Work on an Egg


ISO 200 100mm f29 2 Seconds

Playmobil workman were the chosen toy for this shot, using my new light box for the first time. Setting it up and using the daylight lamps did make cutting out stray light and controlling specular light and unwanted reflections an easy process. Although a fairly simple scene with only six elements it did take a while to assemble to my satisfaction, deciding to go for reflections utilising the perspex ensured that I had to position the camera to include all of the reflections and take care that the reflections themselves added rather than detracted from the final tableaux. Test shots were taken to achieve the correct exposure for a higher key result. Following my usual workflow the final photograph was selected for conversion. Difficulties encountered were with the white elements getting lost in the background so careful local adjustments were made with contrast and the dodge and burn tool. One of the workmen originally wore a white hard hat so I took another frame, having swapped the hats over and merged the 2 images together. Several B&W adjustment layers were used to provide the tonal contrast and a final contrast layers were used to bring out even more detail and make the items "pop" slightly more. The colour slider alteration to the reds dramatically improved the tones on the traffic cones, road sign and writing on the egg. On reflection I am really pleased with this final shot.


2) Pay Peanuts You Get Monkeys


ISO 200 100mm f29 4 Seconds.

This is the original 1970's Pick Up Monkeys game, the idiom "You Pay Peanuts, You Get Monkeys" came straight to mind, the Monkeys provide the game element, a repeat pattern and once again the opportunity to show the creative effect of using the colour sliders. The shelled peanuts have a great texture. Light box and side lamps were used to light the scene. Once more construction for a pleasing composition took a while, difficulties faced were the barrel kept rolling, which I solved by using a small piece of BluTac. Ideally I would have like more of the monkeys' features to be on show but there was a compromise to camera angle versus reflections. I did consider propping each monkey at a slight angle using sticky pads or BluTac but these also reflected in the perspex and the complicated reflections were very challenging to clone out after. There were only four of each coloured monkey in the barrel therefore I moved a blue monkey from one end of the row to the other , re-shot and merged the two images together. Several black and white adjustment layers were used, as well as contrast, and the dodge and burn tool was used to create more of a dramatic effect on the shelled peanuts. I was pleased with the overall composition, but can see that it could be improved by seeing more of the monkeys, and as an after thought I am wondering if I had included a few pennies at the front of the frame in the left-hand corner there would have been a little more emphasis on the money/payment aspect of the idiom.


3) Painting By Numbers


ISO 200 100mm F20 0.6 seconds

Playmobil, Lego, magnetic numbers and paint, combined together make "Painting By Numbers". For this scene I decided to add shadows to the elements as well as reflections, therefore I removed the light box and used not only the side lamps but also the spot lights in my dining room. Setting this tableaux up was great fun, posing the model interesting, ensuring all shadows and reflections worked together was time consuming  and challenging but I am really pleased with the end result; the curving lines of the potted palm shadows/reflections and paint brushes all lead the eye around the frame. To complete the image an extra frame was shot to capture the paint spilling from the tube, a section of the original photograph was cropped, a filter applied to make a line drawing effect and applied as a layer to create the painting being completed by the "numbers." 

It took several attempts to get the correct exposure on this scene. I started to process a chosen image but when I altered the contrast some areas were still appearing darker than I wanted and changing them locally using differing methods/layers/cloning were not producing the desired result so I scrapped it and re-shot using a different aperture and creating a higher key slightly more exposed image. This was much easier to process. Black and White adjustments layers, a curves layer, a contrast layer and dodge and burn were all used in post production.

I was really pleased with the final image and I can't decide if my favourite shot from the high key images is the simplicity of Going to Work on an Egg or the composition and twist on Painting by Numbers.


For the next three images I decided to experiment with low key scenes utilising a black background.

4) Cool as a Cucumber


ISO 200 100mm f29 10 seconds.

The original idea had been create a scene including more cucumber ice cubes, however despite following numerous instructions on how to obtain clear ice all were turning out cloudy. Still wanting to use it as a concept I changed tack and raided Barbie's clothes and equipment to make "cool cucumber" characters and used the ice-cube as a table. I did not use the light box due to the lower lighting conditions caused by the black background, this meant taking care with the angle of the lights to not have light reflecting in the perspex or specular lighting on the cucumbers. The shutter speed had to be increased to allow the correct exposure. Several Black and White adjustment layers were used, a contrast layer, curves layer and finally a little dodge and burn to bring out the texture and tones on the cucumber skin. The only minor problem with this shot was the ice cube melting and slipping on the smooth surface. Sticky pads placed behind to "frame" it helped to secure it's position. I was really happy with the composition and subject matter, the lighting/shade on the ice-cream showing its form and shape using a contrast layer really brought out the reflections.
5) These Boots are Gonna Walk All Over You


ISO 200 70mm f29 13 seconds.

Walking boots and magnetic letters made for a very simple composition. Although very few items included the problems I encountered were the size of the subject and inclusion of the reflection; I had to change the lens length (using a focal length of 70mm) and the orientation of the camera to be able to include the height of the boots and the full reflection. The orientation of the perspex was also altered due to the reflections "falling" off the edge. My initial idea had been to spell out the word YOU in capital letters but none of these would remain upright so lower case were used instead.

The boots were too large to fit in the light box so once again I took care over extraneous light. Black and White/Contrast layers were used in the final processing. I am really pleased with the sharpness of the boots and details in the reflections.  The inside texture of the boot add interest as do the laces being stripy; I don't think the final result would have been as satisfactory if they had been plain.

As previously stated some of my initial ideas did not work either photographically, unable to find props or unable to incorporate the elements to make a coherent final set. This was one of my stand-by ideas which I ended up using. Although a pleasing image I think this is the weakest "idiom" in the set.

6) Gravy Train


ISO 200 100mm f29 5 seconds.

A wooden train set and oxo cubes.....in my warped imagination made for a Gravy Train. Again the composition was too large for the light box so great care was taken with the lighting especially as the Oxo cubes were very shiny. Several test shots were taken and time was spent setting the scene and ensuring the reflections were correctly postioned. At one stage a completely processed final image was reviewed and being not happy with at all deleted it and reshot with a slightly different layout. The direction of the train was altered to coming down the hill rather than going up, which took your eye out of the frame with nothing to lead it back in, extra track was added which I felt assisted with the overall set up and leading lines.

Quite a few Black and White Adjustment layers were used to process this image as the trains and carriages were of several different colours and shades. A contrast layer brought out the reflections and the detail in the train track. This was further brought out by using the burn tool. I think this is my favourite image from the whole set.


Conclusion

On reflection I was, on the whole quite pleased with the 6 images finally produced. Having never had to produce a set taken intentionally for conversion it was interesting to see what worked and what didn't. The use of the colour sliders proved invaluable as in all my photographs were very "busy" when in colour but once converted had very similar grey tones. Although this made for extra work in post production I feel it was worth all the adjustment layers it took to provide tonal contrasts and added interest to the final shots. I particularly liked the effect that increasing contrast had, especially to the wood grain on the train set. If I were to shoot a similar theme/subject again I would probably still consider using items of differing colour as it was the shapes/textures, reflections and narrative of the images that were of more importance. Because there is no distraction of colour I concentrated hard on including interesting shapes and textures and making sure that the compositions had movement and leading lines.

I wanted to experiment with different backgrounds and lighting situations and shooting this final set re-iterated that monochrome images are more forgiving when pushing contrast, curves or levels in either direction. When considering the final results I have a definite preference for the low key images with the black backgrounds. I am not sure if this is due to liking the overall artistic feel of the dark images or because the reflections/contrast and detail seemed to be much stronger in these. The higher key images with the white background don't hold my interest as much although I like the ideas and the compositions.

In conclusion I feel the final photographs meet my initial ideas and the brief of the assignment to explore tone, texture, contrast, form and key. I have gained a greater insight into the creation of monochrome images and the elements required to produce a sucessful image. Creating still life images also enabled me to review/alter compostion and lighting effects until I was really satisfied with the end result. The importance of reviewing images and being prepared to scrap an idea if it hasn't worked was also an important lesson learnt.

Thoughts on Assignment 3

Thinking about what I am going to do for the monochrome exercise has been very interesting with my mind jumping from one idea to another. Flicking once more through some of the B&W photography books borrowed has helped. Some have better images in than others, while the bulk of the books themselves seem to be more about the production of the images rather than choosing suitable topics. So many things can successfully be converted into black and white as long as they fulfil the main criteria of being a good image in the first place. Obviously the previous exercises have shown that when considering subjects for black and white conversion you disregard colour, can be aware that you can post process and “abuse” images more in B&W and consider more in the way of form, shape and even abstraction.

 In “Creative Black and White Photography Advanced Camera and Darkroom Techniques” © 2003 Bernhard J Suess Published by Allworth Press, it was interesting to note that “Among all photographers—professional and amateur—black and white accounts for less than 10 percent of the photos that are taken”

A question asked is “How do you know when the shapes and forms in your black and white composition will be effective?” and the answer given is “The best way to pre-visualize the impact of shapes on your photos is to practice separating form and function. In other words, try to forget about the subject matter of your photo as you abstract a composition from the shapes in front of you.......I try to invent humorous stories about the objects. If I can succeed in inventing plausible alternatives, then it is very likely that I can sit back and “cancel out” both this everyday world and my invented alternative.”

Important things to consider....

• The graphic content of the image is clearer without the distraction of colour.
• A great contrast is being presented between darks and lights.
• Shadows play a big role in the image.

Bearing these in mind I think I want to explore the use of light/shadows, reflections, maybe High and Low Key and try and incorporate humour or some kind of “recognition” within the image linking it to a well known phrase or saying. I have seen quite a few images where the comparisons have been texture or pattern and I would like to see if I can steer away from this and play with shadows and light. This is why I think I am leaning towards still life again, where I will have more control over the lighting conditions and composition.

Another book I found very interesting was “Mastering Digital Black and White, A Photographer’s Guide to High Quality Black-and-White Imaging and Printing” Amadou Diallo c 2007 Thomson Course Technology, which opens with a selection of the authors own images. Fine examples of black and white imagery concentrating of form texture,light, pattern and composition.

Within the book Diallo includes interviews with Chester Higgins (photographer) , Paul Roark (fine art photographer specialising in landscapes) Roy Harrington  (photographer and print maker),  Jean Miele (photographer) Alex Forman (photographer), Jeanne Greco (designer) and Philippe Dollo (photographer). I have had a quick look at all their websites and noted those that I think I shall investigate more, for example Chester Higgins has a wide variety of B&W images as does Paul Roark, Philippe Dollo's
New York, the Fragile City has very grainy images all suggesting movement.

His comments with regards to the final portfolio was also interesting; “At its core, the portfolio tells a story to your audience. Like all satisfying stories, this narrative should have an arc that compels the viewer to turn the page. Now that a selection of images has been made, it’s time to look at how they fit together to create a unified whole.” (p332)

Photographers I looked at for inspiration were.....

Carl Kleiner for his humour and different outlook on everyday objects. The way he combines elements and the composition.

Nils Jorgensen again for his humour and amazing timing. Although not still life and not always black and white the way he composes his images to take advantage of the humour is brilliant.

David Chow for simple composition, use of light and plain backgrounds.

and also

Robert Mapplethorpe  whilst most may immediately think of his nudes and controversial S&M imagery Mapplethorpe had a varied portfolio of flower and statuary studies as well as childrens portraiture. Once again his use of light, shadow and composition is amazing whatever his subject.

Sunday, 12 December 2010

Location Portraiture

I recently completed a short six week course on Location Portraiture run through Bexley College. It was interesting and challenging on many fronts. The biggest challenge was down to the fact the college ran the course at this time of year rather than at the end of spring when the tutor had envisaged it taking place! Due to it being an evening class and too dark with inclement weather taking photographs outside was rather limited and two of the planned lessons had to be scrapped/re-organised due to only being able to shoot indoors.

It was enjoyable working and learning within a group again, bouncing ideas of each other and critiquing each others work. Mini assignments were set, I think the worst was handing over my camera to someone else and allowing them to photograph me! My son obliged and the result is my profile picture. I subsequently converted it to black and white to practise skills learnt in this part of the module.

A later part of the course covered exploring the edges of the frame and not centering the model. So experimenting I extended the frame.


I also practised on friends and revisited some earlier shots not taken for this course.


Another challenge was to walk around the college, find a fairly bright lighting condition with a bright background and create a high key portrait.


The last session was supposed to have been outside learning to use available light and reflectors but as previously mentioned this couldn't happen! We therefore had a studio setup with three tungsten lights trying to create the feel of consistent bright outside light. I didn't do very well! I think it was a case of too many cooks spoil the broth, I couldn't get the angles I wanted, the light where I wanted and the model kept blinking... I have a plethora of eyes closed shots! It was helpful to see the difference between using gold/silver/white and sunlight reflectors. I would like to improve the portraits I take but am now convinced that set up studio portraiture is NOT my calling ;o)

Several photographers were discussed and some were new to me such as William Kline, Larry Sultan, Tina Barney and Tom Hunter.

William Kline

William Klein career has encompassed groundbreaking  photographs of New York, fashion photography, and proto-Pop films. He has been described as idiosyncratic and experimental.
 
Born in New York in 1928, at the age of 20 William Klein went to Paris to study under Fernand Leger, who encouraged his students to reject conformity and the traditional gallery, and go out and work on the streets.
 
As an artist using photography, during the early 1950’s Klein set out to re-invent the photographic document. His photographs were often blurred or out of focus, and his deliberately over-exposed negatives, the use of high-grain film and experimenting with wide angled lenses shocked the established order of the photography world.
 
In 1954, Klein was approached by the director of American Vogue, Alexander Libermanto. He returned to New York to make a ‘photographic diary’ of the city. Financed by Vogue, Klein - who had never photographed fashion before - was surprisingly also given a contract as a fashion photographer for the magazine.  Vogue was shocked the raw and real view of the city he produced, and others saw it as photographically incompetent. Kline took the work back to Paris and managed to find a French publisher who brought it out as a book, entitled ‘New York’ in 1956. Now a much-sought-after collector’s item, this publication was also published in Italy the same year, and went on to win the Nadar prize.
 
Klein produced three other books of photography after this: ‘Rome’ (1960), ‘Moscow’ (1964) and ‘Tokyo’ (1964).
 
Despite Vogue’s reception of the New York streets work, Klein worked for the magazine as a fashion photographer for 10 years between ’55 and ’65. Klein preferred to photograph his models out in on location and, not particularly interested in clothes or fashion, used this opportunity to introduce new techniques to fashion photography that are still used today, including the use of wide-angle and long-focus lenses, long exposures combined with flash and multiple exposures.
 
From 1965 to the early 80’s, Klein abandoned photography and primarily concentrated on film, returning to still photography in the 1980s.
 
Prizes in the 1990’s included the Hasselblad Prize and the Agfa-Bayer/Hugo Erfurt Prize and also during this time he created ‘In & Out of Fashion’, a mixed media project including drawings, photographs and film, which was published simultaneously with shows in London, Paris and New York. In 1997 he re-photographed New York and had shows in Barcelona and Paris. In 1999 he was awarded the ‘Medal of the Century’ by the royal photographic society’ in London.
 
Viewing his images on-line I think I shall have to see if I can find any library books on him. I find myself drawn to all his images, he is proof that you can capture images of things you are not sure of, you can break the rules, you don't need razor sharp images to produce a fascinating and insightful body of work. His black and white images in Italy were stunning.

william klein biography

Larry Sultan

Larry Sultan was born in New York in 1946 and moved with his family to Southern California in 1949. He grew up in the San Fernando Valley. He received a BA in 1968 from the University of California at Santa Barbara and an MFA in 1973 from the San Francisco Art Institute. In San Francisco he was represented by Stephen Wirtz Gallery.

Not only did he have a teaching career completed commercial work for 'W Magazine', 'Vanity Fair', and other important clients, he also produced a large and widely influential body of personal work. His first major project was a collaboration with the artist Mike Mandel: a book of appropriated photographs titled  "Evidence"  The pictures came from the files of government agencies, corporations, and research institutions, offering a witty and provocative look at contemporary American culture. It wasn't until I started to check up on Sultan for this post that I realised I have come across "Evidence" when looking into other work.

In 1992 Sultan compiled the book and accompanying exhibition "Pictures from Home". The decade-long project began when his father, a vice president at Schick Safety Razor Company, was forced into early retirement. Sultan started by photographing his parents and their home lives, then also started to include extensive diaristic writing, family artifacts, and stills from his parents' home movies.

Working in the San Fernando Valley on "Pictures from Home" led Sultan to his next project, "The Valley", an investigation of suburban houses used as sets for pornographic films. "The Valley" was presented at SFMOMA in 2004 as a solo exhibition of more than 50 large-scale photographs shot between 1999 and 2003.

Sultan exhibited internationally throughout his career. His work is in the collections of SFMOMA; the Whitney Museum of American Art, New York; the Guggenheim Museum, New York; the Art Institute of Chicago; the Stedelijk Museum, Amsterdam; and Tate Modern, London. He received numerous grants and awards, including five NEA grants, a Guggenheim Fellowship, a Louis Tiffany Comfort Award, and a Fleishhacker Fellowship.
Not sure if I actually like his work :o/ Not sure if it is the style or the subjects? I love the lighting and his bold use of colours but as images I can't connect to them like I can with other photographers' images.

YouTube - Larry Sultan on The Genius of Photography

Tina Barney

When people say that there is a distance, a stiffness in my photographs, that the people look like they do not connect, my answer is, that this is the best that we can do. This inability to show physical affection is in our heritage.
— Tina Barney

I must admit that when I first saw Tina Barney's photographs that was the first impression I got. Very formal, very stiff, no-one looks totally natural/comfortable. But this is probably due to, as she states, their up-bringing and culture. Barney chose to photograph what she knew, and what she knew were her friends and family; the social elite of New York and New England. When examining her style it has the feel of a tableau and subject matter raises issues of privilege and the interaction of family members. Using a large format camera she would almost direct the subjects in her photographs. Apparently she was one of the first photographers to produce massive prints at 4 feet by 5 feet. I guess because I am so far removed from this world I find it hard to relate to the images or feel any emotion/interest towards the characters.

Born in New York in 1945 into "old money" and a society where wealth and society mattered I think you can tell this through the images Barney takes. The large prints enable you to view every object within the frame and these objects obviously tell us so much about the people who inhabit these environments.

Even if I can't relate to the subjects once again I can appreciate her ability to capture the essence of a world I have no access to, her use of lighting and colour is well thought out and executed, even the wariness of her subjects can be explained. Old money does not call attention to itself. "There is an overall feeling of old money that you have to guard it," Barney has said, "and I'm part of that."
This highlights what is important for her and many others. Cultural familiarity—knowing your subject, being comfortable in it, being able to make your subjects comfortable, it's an aspect of informal location portraiture  that's generally celebrated. Other examples of photographers who achieved this are Anders Petersen, who explored Hamburg's Reeperbahn district, or Juliana Beasley, who turned her stripper's background into a platform for a photographic series. They photographed the people they associated with, and gave their viewers a glimpse into a world they might not have witnessed otherwise.

If nothing else Barney has given us an insight to this world and eventually, sociologically this body of work may provide a window into history.

Museum of Contemporary Photography

I can see a fair few similarities in the work of Sultan and Barney.

Tom Hunter

Tom Hunter is another photographer who captures what he knows and takes images of the loacl people and their environment around Hackney. What I love and enjoy about his work is his ability to reference historical artists within his images.

Tom Hunter - Artist

He has several exhibitions on at present and I am going to try and get to at least one.

Saturday, 11 December 2010

Exercise 18: Colours into tones - 2

The aim of this project was to make practical use of the channel adjustment to achieve a specific effect. I opted to use a portrait in which I lightened the complexion without significantly altering the tones of the rest of the image. In addition I had to prepare the image taking advantage of a default black and white conversion offered by photoshop.

The image I settled on was a portrait of my son taken during the portrait exercise in Project 1.


Original Colour

This is the original colour version.
Default Black and White

Alteration using one of the default settings within CS4, I chose to use a Black and White adjustment layer. The background appears to be darker, in this particular instance, when  converted to black and white. Skin tone also appears a little darker and the image to me, looks slightly flat. The subject no longer appears so "separate" from the background.


Default Channel Settings

These were the Channel settings before being adjusted.


After Adjustment

Not being too sure what effect each colour slider would have on the overall image I took a note of the original values and experimented, discovering the following for this image: -

Reds - made very little change to the overall image but significantly altered the complexion.
Yellows -  affected the majority of the image including the complexion.
Greens - a minimal adjustment to the background.
Cyans - again minimal adjustment to the overall image.
Blues - altered the white highlights in the background and the shirt collar.
Magentas - only seemed to affect the shirt collar.
 As I did not want to alter the background at all I decided to use two B&W adjustment layers. For the first layer I did not alter the channel sliders at all but only applied the layer mask selectively to the background. The second layer  both the Red and Yellow Channels values were increased; Reds to 126 and Yellows to 98.


Side by Side to Compare


Placing the two images side by side for comparison  shows how very subtle alterations to the Channels can improve default conversions. The changes made to Red and Yellow have made for a more natural looking complexion and helped to make the main subject stand out from the darker background. This exercise has also shown me how some Channels can effect more of an image than others. Converting to Black and White and making use of the adjustments available in Channels can make a seemingly uninteresting image more appealing/atmospheric and even allow you to rescue other photographs where you would be unable to correct the colours/tonal range without making the final result look fake.


Exercise 17: Colours into tones -1

To complete this exercise I had to take an image containing at least two strong contrasting colours, for example yellow and blue or red and green. Using the channel sliders or tools available in photoshop I had to create two opposite versions of the image in black and white.

In one I had to lighten the greyscale tone of one of the colours and darken the tone of the contrasting colour as much as possible. In the second version I had to perform the reverse.

It was recommended that this exercise was performed on a RAW image due to the direct access to the original three channels. A default greyscale image was created as a reference so I could note the effect that moving the sliders had on the entire image. It was also interesting to note what effect these adjustments had on the creative quality of the image.

Interesting and helpful webpage...

Understanding Colour 2 – Converting Colour to Black and White Tutorial – Photography Tutorials, News and Reviews For The Real...

Red and Green

As per the remit I chose an image which contained the strong contrasting colours of red and green.


Original Unedited colour version
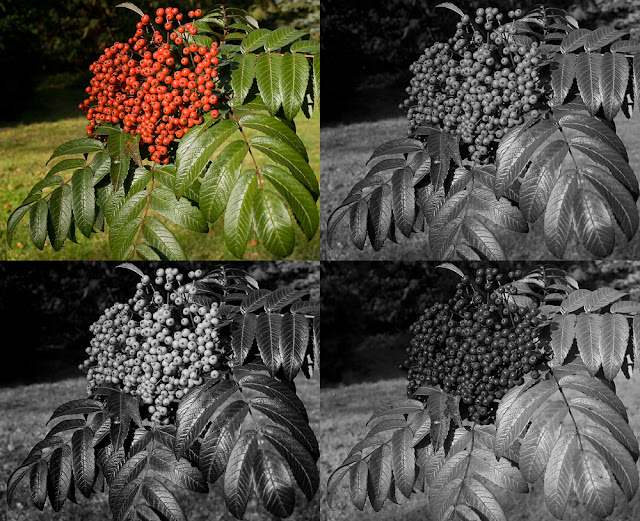
 I then created a default black and white conversion which really shows how close in tone red and green are. Being told that red and green appear the exact shade of grey is not the same as physically seeing it happen.The straight conversion with no adjustment  is left with very little tonal range.


Default Black and White Conversion


The first adjustment I made was to increase the red tones and reduce the green. The effect this had on the image was to lighten the reds and darken the greens. I could move the green slider all the way to the left having a value of -200 and still retain detail, even though the leaves and background became very dark. Moving the red slider to the full extent lightened them too much as if the image was over exposed.


High Red Low Green
 Next the adjustments were made in the reverse, once again I could move the green slider to the extreme and still retain a fairly natural tone, however moving the red tones to the extreme left the berries completely black with no detail.

High Green Low Red


Adjustments to the extremes

Here are all four images together for comparison purposes.


My personal preference was for the high red/low green combination. I created a final photograph by making local adjustments using a levels adjustment layer which created more of a contrast and a better black and white image.

Although the exercise called for only one image to be adjusted I was curious to see what happened with blue/yellow tones.

Default Colour


Default Black and White

High Yellow Low Blue

High Blue Low Yellow


Comparisons
 
It was interesting to note that other tones in the background altered, for example the red telephone box became lighter with the high yellow/low blue adjustment.

On reflection these exercises prove that although you need to carefully consider colours when taking a photograph "in colour" for later conversion to black and white if an image contains colours which are identical or very close in tone with careful adjustments tones and contrast can be reinstated.


Exercise 16: Strength of interpretation

There is an interesting effect on processing and reproduction quality when you remove the element of colour. So much more can be done with the interpretation of the tonal range. More aggressive changes can be done with brightness and contrast than would be expected with colour.

For exercise 16 I needed to choose two photographs that best suited the following adjustments:

  • A strong increase in contrast that will include clipping in at least the shadow areas. A pronounced S-curve is the standard method.
  • Low key or high key treatment, in which the entire brightness range is shifted down or up the scale. Curves or levels are equally useful in creating this effect.

I had to create these effects, one for each image but in two versions; one in colour the other in black and white.

High Key

The original image was taken in a local cemetery mid afternoon, providing deep blue skies, rich colours and long shadows. This image has not been processed in any way.


Original

Shifting the entire brightness range to the end of the scale created a totally unusable image. After adjusting the levels slider to create a high key, slightly over exposed image the scene has a colder feel with the light having a bright early morning look. The scroll on the headstone no longer has the impact it did in the original image. Experimenting further with curves/levels  making the photograph a lot brighter, the scene lost detail and noise was introduced in the shadows and in the trees.
High Key Treatment
Creating a high key black and white image the emphasis remains on the scroll, the lack of colour in the leaves gives more attention to their detail and texture than in either of the first two photographs. The B&W image could take the same amount of adjustment whilst retaining a realistic look. It illustrates that tonal range can be just as important and in some instances even more so when considering which images will translate into a black and white scene.


Black and White Conversion
Contrast

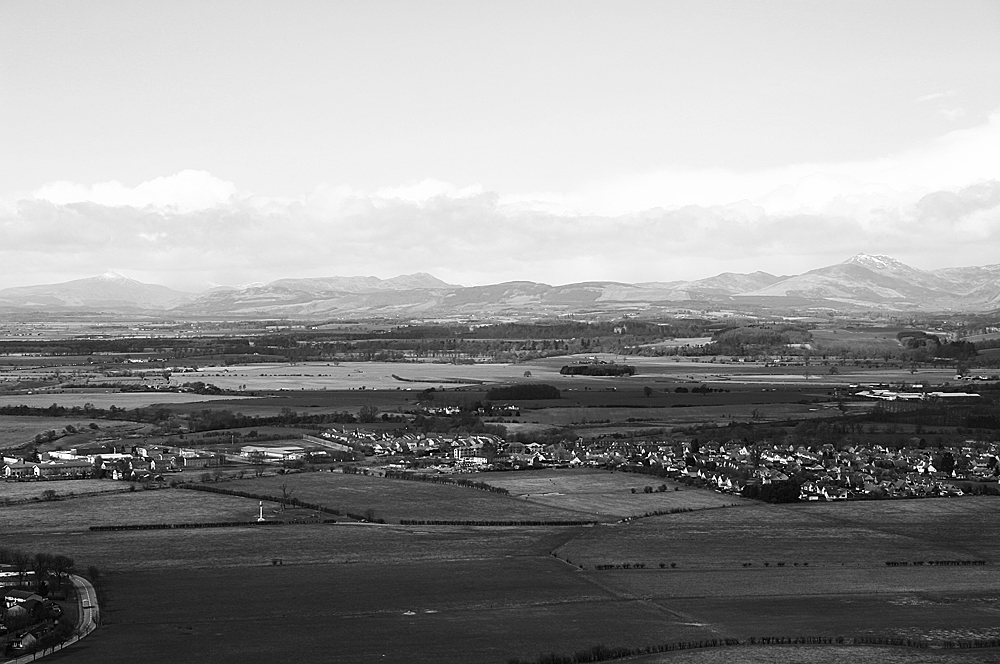
This image is of a view of Scotland, the lighting was fairly flat and the colours subdued. Again this image has not been processed before conversion.


A very pronounced curve rendered the image unusable and also when converting to B&W with such a pronounced curve, areas were too dark with loss of detail. Introducing  a strong contrast using an S-curve strengthened the colours but lightened the sky. Clipping became apparent in the darker areas such as the trees and whilst the mountains in the background have improved their appearance the colours in the foreground have become unnatural.


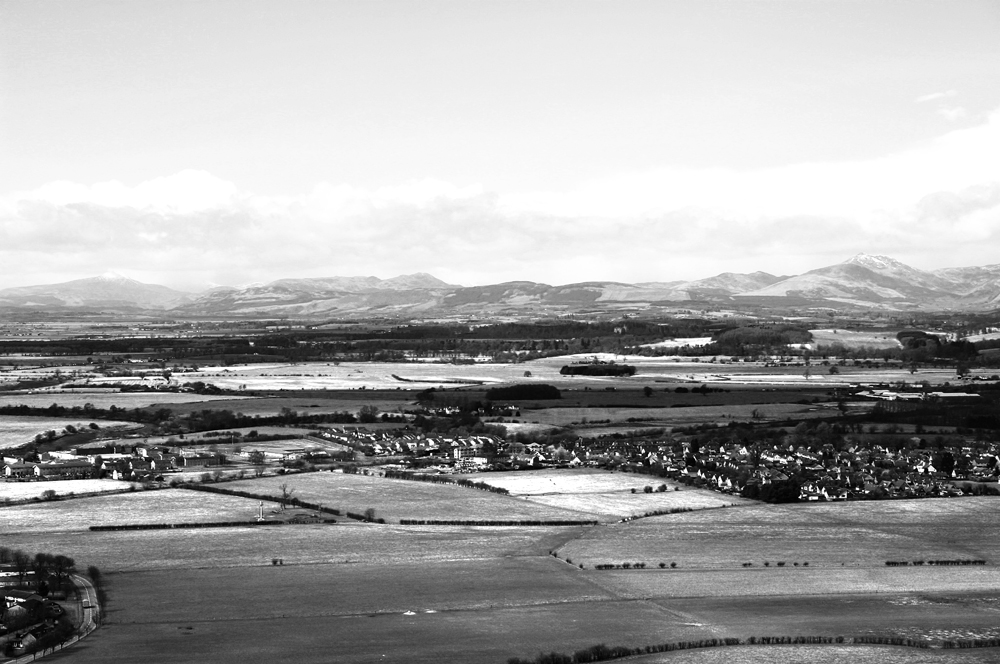
Converting the image to B&W and applying the same level of adjustment presents a more acceptable scene, even if the foreground is a little dark, once more it is the tones, shape and field patterns that you notice.
Experimenting with the green and yellow channels afterwards, to lighten the foreground, has given an interesting interpretation with the scene appearing to be a snowy winters day.

Although theoretically a simple exercise I found this quite tricky. Some of the images I initially selected thinking they would respond well to high key or high contrast treatment failed terribly. Some which fared well with the initial treatments did not translate at all into black and white. I discovered that you can push the boundaries at either end of the scale more in black and white than you can in colour. Not only do unnatural colours "disappear" but digital noise/grain can be more acceptable. This exercise has again emphasised the need for taking into consideration tones, shape, volume, framing and exposure when considering subjects/scenes for black and white conversion.

Exercise 15: Black and White

For this exercise I needed to choose a subject, lighting condition or photographic situation that I thought may look better in black and white. The image had to be shot in colour with the black and white version created during processing. In shooting I needed to ignore the colour element.

From NCFE Level 2
Composing and exposure for the black and white version meant I had to pay close attention to other details such as form, pattern and texture.The previous tasks have experimented with the degrading of colour saturation and this exercise moves on to full monochrome conversion. This was interesting for me to undertake. In my previous portfolio I was concentrating on the subject and matching colours/tones where possible.


From NCFE Level 2


In choosing the subject for this exercise I experimented with several images and ideas. Some I thought would make for a good conversion others I was not sure. I looked at some of the photographs I already had and wondered what one of my landscape shots would look like after conversion.

I thought it worked fairly well with the textures and shapes, however this wasn't taken intentionally for conversion. There were several different colours within this image and I was curious to see the result. Although I have seen very effective black and white landscape scenes (obviously Ansell Adams) admiring the work and being able to produce it are entirely different!

Due to the weather being snowy outside the house was scoured for inspiration and  eventually  a series of shots of my bathroom shelf were taken. Quite pleased with the conversion I liked the contrasty/high key effect achieved due to the bright lighting conditions and after during the post processing. However I do have mixed feelings as to if this was almost monochrome from the outset? There were no real strong colour stimuli to ignore but the choice of subject was made because of the form, shapes and pattern. I loved the way the vase refracted the venetian blind, the reflections and shadows in the image as a whole. The colours were not important, despite the fact all the products were from a set and of similar colour, it was the difference in opacity, materials and shapes of the packaging/items that I thought would make an interesting scene.

Due to the bright background and dark foreground, despite using a reflector, I had to make local adjustments to the exposure, this introduces a little noise on the tiled windowsill but the effect is minimised due to monochrome conversion.

My final conversion was of a decoration on my Christmas tree this time taking into consideration the different texture between the prickly tree and the smooth shiny decoration. The pattern of the needles reflecting in the metal angel added interest.

The default conversion was made using a black and white adjustment layer with adjustments made to the colour sliders , manipulating the RGB channels.

Thinking about taking an image specifically for conversion to black and white definitely made me concentrate more on the shapes, textures, form and patterns created by the subjects. I think that the framing and compositional techniques used were not that different from that had I been shooting for a final colour print. The colours could be disregarded. The first image taken in the bathroom was brightly back lit and I used a large piece of white cardboard to reflect some light back onto the bottles and soap box. The Christmas decoration was taken in very low light, with and a fairly long exposure. I could increase or decrease the exposure more as Black and White conversion is more forgiving with the extremes and any introduction of noise/digital artifacts has little or no effect on the final image.

Creative vision for shooting B&W takes a little training and this exercise has helped to show what can be achieved when concentrating on the aspects of contrast, key, geometry, volume and texture.

The course notes mention Cristoforo Landino, a 15th century writer/translator and poet who commented on many famous pieces of Renaissance art/literature, he introduced several terms to describe art and individual artists work which can help artists and photographers alike to view subjects as separate elements of composition, linear design and colour.

- imparting a sense of relief, or the illusion of three dimensions to a two dimensional rendering by virtue of tonality (Cristoforo Landino’s term).
rilievo

On reflection I rather like B&W conversion ;o)

disegno- judicious use of line (as opposed to tone) to circumscribe forms (emphasis on contour and outline) (Cristoforo Landino’s term).
 http://faculty.unlv.edu/mcrae/monument_lists/art_261_monument_list_04.pdf

In 1481, the scholar Cristoforo Landino in the Preface to his Italian commentary on Dante's Divine Comedy, adapts Latin terms such as those used by Rinuccini to the vernacular so that they read ornato and artificioso. But he also uses terms which were perhaps more familiar to his Florentine audience such as prompto and divoto to characterize the individual styles of different artists

ingentaconnect GIOVANNI RUCELLAI'S COMMENTS ON ART AND ARCHITECTURE